


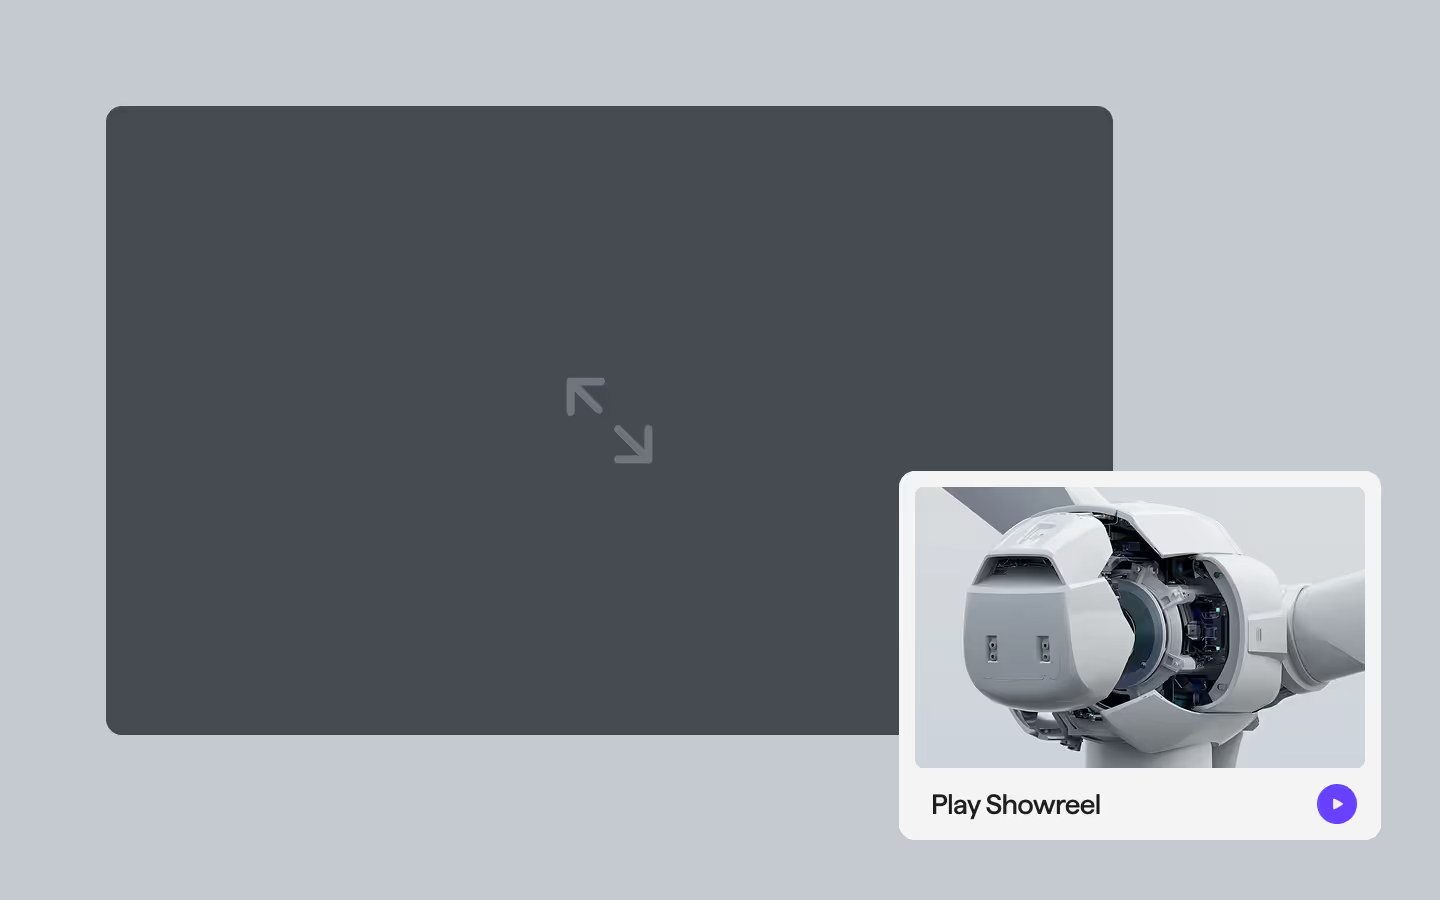
Mini Showreel Player
Documentation
Webflow
Code
Setup: External Scripts
External Scripts in Webflow
Make sure to always put the External Scripts before the JavasScript step of the resource. In this video you learn where to put these in your Webflow project:
HTML
<script src="https://cdn.jsdelivr.net/npm/gsap@3.14.1/dist/gsap.min.js"></script>
<script src="https://cdn.jsdelivr.net/npm/gsap@3.14.1/dist/Flip.min.js"></script>
Step 1: Copy structure to Webflow
Copy structure to Webflow
In the video below we described how you can copy + paste the structure of this resource to your Webflow project:
Copy to Webflow
Webflow structure is not required for this resource.
Step 1: Add HTML
HTML
<div data-mini-showreel-lightbox="showreel" data-mini-showreel-status="not-active" class="mini-showreel-lightbox">
  <div data-mini-showreel-close="" class="mini-showreel-lightbox__dark"></div>
  <div data-mini-showreel-safearea="" class="mini-showreel-lightbox__safearea">
    <div data-mini-showreel-target="" class="mini-showreel-lightbox__target">
      <div class="mini-showreel__before"></div>
    </div>
  </div>
</div>
<div data-mini-showreel-player="showreel" data-mini-showreel-status="not-active" class="mini-showreel">
  <div class="mini-showreel__card">
    <div class="mini-showreel__media">
      <div class="mini-showreel__video">
        <div class="mini-showreel__before"></div>
        <img src="https://cdn.prod.website-files.com/69735ed659ef17a01e7fd765/69737693f36c8720e06f4cb4_wind-turbine-3000x3000.avif" loading="lazy" alt="" class="mini-showreel__cover-image">
      </div>
    </div>
    <div class="mini-showreel__info">
      <span class="mini-showreel__text">Play Showreel</span>
      <svg xmlns="http://www.w3.org/2000/svg" width="100%" viewbox="0 0 40 40" fill="none" class="mini-showreel__play-svg"><rect width="40" height="40" rx="20" fill="#6840FF"></rect><path d="M16.1206 15.8199C16.1206 14.8986 17.116 14.3209 17.916 14.778L25.1594 18.9171C25.9655 19.3778 25.9655 20.5402 25.1594 21.0009L17.916 25.14C17.116 25.5971 16.1206 25.0195 16.1206 24.0981V15.8199Z" fill="#F4F4F4"></path></svg>
    </div>
    <div data-mini-showreel-open="showreel" class="mini-showreel__click"></div>
  </div>
</div>
HTML structure is not required for this resource.
Step 2: Add CSS
CSS
.mini-showreel-lightbox {
  pointer-events: none;
  justify-content: center;
  align-items: center;
  padding: 3em;
  display: flex;
  position: fixed;
  inset: 0;
  overflow: hidden;
}

.mini-showreel-lightbox__safearea {
  justify-content: center;
  align-items: center;
  width: 100%;
  height: 100%;
  display: flex;
}

.mini-showreel-lightbox__target {
  justify-content: center;
  align-items: center;
  width: 100%;
  display: flex;
}

.mini-showreel-lightbox__dark {
  opacity: 0;
  pointer-events: auto;
  cursor: pointer;
  visibility: hidden;
  background-color: #0009;
  width: 100%;
  height: 100%;
  position: absolute;
}

.mini-showreel {
  flex-flow: column;
  justify-content: center;
  align-items: center;
  width: min(100vw - 3em, 25em);
  display: flex;
  position: relative;
}

.mini-showreel__card {
  grid-column-gap: 1em;
  grid-row-gap: 1em;
  color: #201d1d;
  background-color: #f4f4f4;
  border-radius: 1em;
  flex-flow: column;
  width: 100%;
  padding: 1em;
  display: flex;
  position: relative;
}

.mini-showreel__media {
  z-index: 1;
  position: relative;
}

.mini-showreel__video {
  background-color: #cfd5dc;
  border-radius: .25em;
  width: 100%;
  position: relative;
  overflow: hidden;
}

.mini-showreel__cover-image {
  object-fit: cover;
  width: 100%;
  height: 100%;
  position: absolute;
  top: 0;
  left: 0;
}

.mini-showreel__before {
  padding-top: 62.5%;
}

.mini-showreel__info {
  justify-content: space-between;
  align-items: center;
  height: 1.75em;
  padding-left: .5em;
  display: flex;
  position: relative;
}

.mini-showreel__text {
  letter-spacing: -.02em;
  font-size: 1.25em;
  font-weight: 600;
}

.mini-showreel__play-svg {
  width: 1.75em;
}

.mini-showreel__click {
  z-index: 2;
  cursor: pointer;
  width: 100%;
  height: 100%;
  position: absolute;
  top: 0;
  left: 0;
}

[data-mini-showreel-status="active"] .mini-showreel__click {
  display: none;
}

[data-mini-showreel-status] .mini-showreel__info {
  transition: margin 1s cubic-bezier(0.87, 0, 0.13, 1);
}

[data-mini-showreel-status="active"] .mini-showreel__info {
  margin-top: -2.75em;
}

[data-mini-showreel-status] .mini-showreel__card {
  transition: margin 1s cubic-bezier(0.87, 0, 0.13, 1);
}

[data-mini-showreel-status="active"] .mini-showreel__card {
  margin-top: 1.375em;
  margin-bottom: 1.375em;
}

[data-mini-showreel-status] .mini-showreel-lightbox__dark {
  transition: all 1s cubic-bezier(0.87, 0, 0.13, 1);
}

[data-mini-showreel-status="active"] .mini-showreel-lightbox__dark {
  opacity: 1;
  visibility: visible;
}
Step 2: Add custom Javascript
Custom Javascript in Webflow
In this video, Ilja gives you some guidance about using JavaScript in Webflow:
Step 2: Add Javascript
Step 3: Add Javascript
Javascript
gsap.registerPlugin(Flip);

function initMiniShowreelPlayer() {
  const openBtns = document.querySelectorAll("[data-mini-showreel-open]");
  if (!openBtns.length) return;

  // Settings
  var duration = 1;
  var ease = "expo.inOut";
  var zIndex = 999;

  let n = "", isOpen = false;
  let lb, pw, tg;
  let pwCss = "", lbZ = "", pwZ = "";

  const q = (sel, root = document) => root.querySelector(sel);

  const getLB = (name) => q(`[data-mini-showreel-lightbox="${name}"]`);
  const getPW = (name) => q(`[data-mini-showreel-player="${name}"]`);

  const safe = (t) => t.closest("[data-mini-showreel-safearea]") || q("[data-mini-showreel-safearea]", t) || t;

  const fit = (b, a) => {
    let w = b.width, h = w / a;
    if (h > b.height) { h = b.height; w = h * a; }
    return {
      left: b.left + (b.width - w) / 2,
      top: b.top + (b.height - h) / 2,
      width: w,
      height: h
    };
  };

  const rectFor = (t) => {
    const b = safe(t).getBoundingClientRect();
    const r = t.getBoundingClientRect();
    const a = r.width > 0 && r.height > 0 ? r.width / r.height : 16 / 9;
    return fit(b, a);
  };

  const place = (el, r) =>
    gsap.set(el, {
      position: "fixed",
      left: r.left,
      top: r.top,
      width: r.width,
      height: r.height,
      margin: 0,
      x: 0,
      y: 0
    });

  function setStatus(status) {
    if (!n) return;
    document.querySelectorAll(`[data-mini-showreel-lightbox="${n}"], [data-mini-showreel-player="${n}"]`).forEach((el) => el.setAttribute("data-mini-showreel-status", status));
  }

  function zOn() {
    lbZ = lb?.style.zIndex || "";
    pwZ = pw?.style.zIndex || "";
    if (lb) lb.style.zIndex = String(zIndex);
    if (pw) pw.style.zIndex = String(zIndex);
  }

  function zOff() {
    if (lb) lb.style.zIndex = lbZ;
    if (pw) pw.style.zIndex = pwZ;
  }

  function openBy(name) {
    if (!name || isOpen) return;

    lb = getLB(name);
    pw = getPW(name);
    if (!lb || !pw) return;

    tg = q("[data-mini-showreel-target]", lb);
    if (!tg) return;

    n = name;
    isOpen = true;

    pw.dataset.flipId = n;
    pwCss = pw.style.cssText || "";

    zOn();
    setStatus("active");

    const state = Flip.getState(pw);
    place(pw, rectFor(tg));

    Flip.from(state, {
      duration: duration,
      ease: ease,
      absolute: true,
      scale: false
    });
  }

  function closeBy(nameOrEmpty) {
    if (!isOpen || !pw) return;
    if (nameOrEmpty && nameOrEmpty !== n) return;

    setStatus("not-active");

    const state = Flip.getState(pw);

    pw.style.cssText = pwCss;
    if (lb) lb.style.zIndex = String(zIndex);
    if (pw) pw.style.zIndex = String(zIndex);

    Flip.from(state, {
      duration: duration,
      ease: ease,
      absolute: true,
      scale: false,
      onComplete: () => {
        zOff();
        n = "";
        isOpen = false;
        lb = pw = tg = null;
        pwCss = "";
        lbZ = "";
        pwZ = "";
      }
    });
  }

  function onResize() {
    if (!isOpen || !pw || !tg) return;
    place(pw, rectFor(tg));
  }

  openBtns.forEach((btn) => {
    btn.addEventListener("click", (e) => {
      e.preventDefault();
      openBy(btn.getAttribute("data-mini-showreel-open") || "");
    });
  });

  document.addEventListener("click", (e) => {
    const closeBtn = e.target.closest("[data-mini-showreel-close]");
    if (!closeBtn) return;
    e.preventDefault();
    closeBy(closeBtn.getAttribute("data-mini-showreel-close") || "");
  });

  window.addEventListener("keydown", (e) => {
    if (e.key === "Escape") closeBy("");
  });

  window.addEventListener("resize", onResize);
}

// Initialize Mini Showreel Player
document.addEventListener("DOMContentLoaded", function () {
  initMiniShowreelPlayer();
});
Step 3: Add custom CSS
Step 2: Add custom CSS
Custom CSS in Webflow
Curious about where to put custom CSS in Webflow? Ilja explains it in the below video:
CSS
[data-mini-showreel-status="active"] .mini-showreel__click {
  display: none;
}

[data-mini-showreel-status] .mini-showreel__info {
  transition: margin 1s cubic-bezier(0.87, 0, 0.13, 1);
}

[data-mini-showreel-status="active"] .mini-showreel__info {
  margin-top: -2.75em;
}

[data-mini-showreel-status] .mini-showreel__card {
  transition: margin 1s cubic-bezier(0.87, 0, 0.13, 1);
}

[data-mini-showreel-status="active"] .mini-showreel__card {
  margin-top: 1.375em;
  margin-bottom: 1.375em;
}

[data-mini-showreel-status] .mini-showreel-lightbox__dark {
  transition: all 1s cubic-bezier(0.87, 0, 0.13, 1);
}

[data-mini-showreel-status="active"] .mini-showreel-lightbox__dark {
  opacity: 1;
  visibility: visible;
}
Implementation
Lightbox
Use [data-mini-showreel-lightbox="name"] as the wrapper that contains the target frame the player should animate into.
Safearea
Use [data-mini-showreel-safearea] to constrain the maximum size of the target frame so the player always fits nicely within a defined area.
Target
Use [data-mini-showreel-target] inside the lightbox to define the exact frame the player should match in width, height, and position.
Player
Use [data-mini-showreel-player="name"] as the wrapper that gets moved and resized with Flip during open and close.
Controls
Use [data-mini-showreel-open="name"] on any trigger element to open the matching showreel and animate the player into the target.
Use [data-mini-showreel-close] to close the currently open showreel, or use [data-mini-showreel-close="name"] to close a specific one.
Status
Add [data-mini-showreel-status="not-active"] on both wrapper elements so the script can switch them between active and not-active for styling and state.
Bonus: Adding the Advanced HLS Player
To keep this resource lightweight, the HLS player is optional. You can add the Custom Bunny HLS Player (Advanced) inside the card to enable a full video player experience with controls. To integrate it, follow these 3 steps.
Step 1: Add the HLS Player
Follow the resource steps from the Custom Bunny HLS Player (Advanced), on the first step replace the .mini-showreel__video element with the Webflow copy or HTML. Continue with the JavaScript and CSS part like described.
Step 2: Replace the JavaScript
Replace the initMiniShowreelPlayer() script with the updated version below that includes the HLS Player play and pause logic, so opening starts playback and closing stops playback. We still need the initBunnyPlayer() as a seperate function.
gsap.registerPlugin(Flip);

function initMiniShowreelPlayer() {
  const openBtns = document.querySelectorAll("[data-mini-showreel-open]");
  if (!openBtns.length) return;

  // Settings
  var duration = 1;
  var ease = "expo.inOut";
  var zIndex = 999;

  let n = "", isOpen = false;
  let lb, pw, tg;
  let pwCss = "", lbZ = "", pwZ = "";

  const q = (sel, root = document) => root.querySelector(sel);

  const getLB = (name) => q(`[data-mini-showreel-lightbox="${name}"]`);
  const getPW = (name) => q(`[data-mini-showreel-player="${name}"]`);

  const safe = (t) => t.closest("[data-mini-showreel-safearea]") || q("[data-mini-showreel-safearea]", t) || t;

  const fit = (b, a) => {
    let w = b.width, h = w / a;
    if (h > b.height) { h = b.height; w = h * a; }
    return {
      left: b.left + (b.width - w) / 2,
      top: b.top + (b.height - h) / 2,
      width: w,
      height: h
    };
  };

  const rectFor = (t) => {
    const b = safe(t).getBoundingClientRect();
    const r = t.getBoundingClientRect();
    const a = r.width > 0 && r.height > 0 ? r.width / r.height : 16 / 9;
    return fit(b, a);
  };

  const place = (el, r) =>
    gsap.set(el, {
      position: "fixed",
      left: r.left,
      top: r.top,
      width: r.width,
      height: r.height,
      margin: 0,
      x: 0,
      y: 0
    });

  function setStatus(status) {
    if (!n) return;
    document.querySelectorAll(`[data-mini-showreel-lightbox="${n}"], [data-mini-showreel-player="${n}"]`).forEach((el) => el.setAttribute("data-mini-showreel-status", status));
  }

  function zOn() {
    lbZ = lb?.style.zIndex || "";
    pwZ = pw?.style.zIndex || "";
    if (lb) lb.style.zIndex = String(zIndex);
    if (pw) pw.style.zIndex = String(zIndex);
  }

  function zOff() {
    if (lb) lb.style.zIndex = lbZ;
    if (pw) pw.style.zIndex = pwZ;
  }

  function playFor(name) {
    const wrap = getPW(name);
    if (!wrap) return;

    const bunny = wrap.querySelector("[data-bunny-player-init]");
    const video = wrap.querySelector("video");
    if (!video) return;

    if (bunny) {
      const btn = bunny.querySelector('[data-player-control="play"], [data-player-control="playpause"]');
      if (btn && (video.paused || video.ended)) btn.click();
      return;
    }

    try { video.play(); } catch(_) {}
  }

  function stopFor(name) {
    const wrap = getPW(name);
    if (!wrap) return;

    const bunny = wrap.querySelector("[data-bunny-player-init]");
    const video = wrap.querySelector("video");
    if (!video) return;

    if (bunny) {
      const btn = bunny.querySelector('[data-player-control="pause"], [data-player-control="playpause"]');
      if (btn && (!video.paused && !video.ended)) btn.click();
    } else {
      try { video.pause(); } catch(_) {}
    }

    try { video.currentTime = 0; } catch(_) {}
  }

  function openBy(name) {
    if (!name || isOpen) return;

    lb = getLB(name);
    pw = getPW(name);
    if (!lb || !pw) return;

    tg = q("[data-mini-showreel-target]", lb);
    if (!tg) return;

    n = name;
    isOpen = true;

    pw.dataset.flipId = n;
    pwCss = pw.style.cssText || "";

    zOn();
    setStatus("active");
    playFor(n);

    const state = Flip.getState(pw);
    place(pw, rectFor(tg));

    Flip.from(state, {
      duration: duration,
      ease: ease,
      absolute: true,
      scale: false
    });
  }

  function closeBy(nameOrEmpty) {
    if (!isOpen || !pw) return;
    if (nameOrEmpty && nameOrEmpty !== n) return;

    stopFor(n);
    setStatus("not-active");

    const state = Flip.getState(pw);

    pw.style.cssText = pwCss;
    if (lb) lb.style.zIndex = String(zIndex);
    if (pw) pw.style.zIndex = String(zIndex);

    Flip.from(state, {
      duration: duration,
      ease: ease,
      absolute: true,
      scale: false,
      onComplete: () => {
        zOff();
        n = "";
        isOpen = false;
        lb = pw = tg = null;
        pwCss = "";
        lbZ = "";
        pwZ = "";
      }
    });
  }

  function onResize() {
    if (!isOpen || !pw || !tg) return;
    place(pw, rectFor(tg));
  }

  openBtns.forEach((btn) => {
    btn.addEventListener("click", (e) => {
      e.preventDefault();
      openBy(btn.getAttribute("data-mini-showreel-open") || "");
    });
  });

  document.addEventListener("click", (e) => {
    const closeBtn = e.target.closest("[data-mini-showreel-close]");
    if (!closeBtn) return;
    e.preventDefault();
    closeBy(closeBtn.getAttribute("data-mini-showreel-close") || "");
  });

  window.addEventListener("keydown", (e) => {
    if (e.key === "Escape") closeBy("");
  });

  window.addEventListener("resize", onResize);
}

// Initialize Mini Showreel Player (with Advanced Player Support)
document.addEventListener("DOMContentLoaded", function () {
  initMiniShowreelPlayer();
});
Step 3: Add extra CSS
To make sure the placeholder, dark overlay, interface and play button hide and show correctly, add the CSS below.
/* Mini Showreel Player: Extra CSS */

[data-mini-showreel-status="not-active"] [data-bunny-player-init][data-player-status] .bunny-player__placeholder {
  opacity: 1;
  visibility: visible;
}

[data-mini-showreel-status="not-active"] [data-bunny-player-init][data-player-status] .bunny-player__dark {
  opacity: 0;
}

[data-mini-showreel-status="not-active"] [data-bunny-player-init] .bunny-player__playpause {
  opacity: 0;
}

[data-mini-showreel-status="not-active"] [data-bunny-player-init] .bunny-player__interface {
  opacity: 0;
  transform: translateY(1em) rotate(0.001deg);
}Resource details
Last updated
January 26, 2026
Category
Video & Audio
Need help?
Join Slack
Original source
 Dennis Snellenberg
Creator Credits
We always strive to credit creators as accurately as possible. While similar concepts might appear online, we aim to provide proper and respectful attribution.